Utilize Event Sessions for a Conference
- Allow event registrants to register for conference breakout sessions
- Charge for sessions
- Create registrant lists for each session
Where to Setup Event Sessions
-
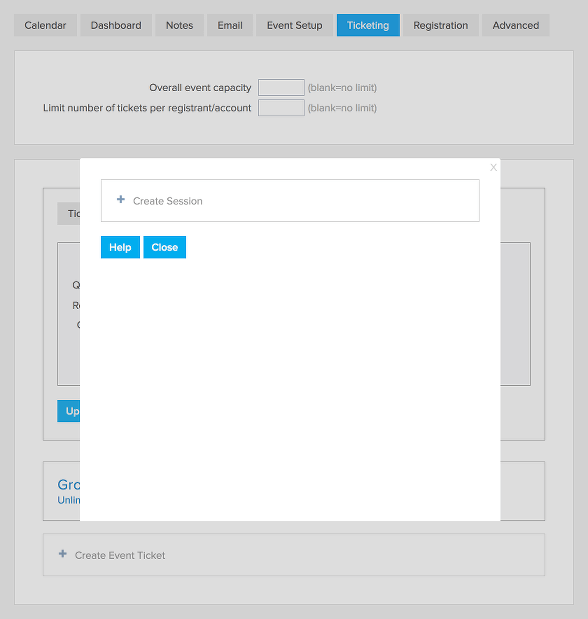
Go to the event’s Ticketing tab
-
Click on + Add Event Ticket to create a ticket
-
Select the Questions / Sessions / Add-On tab
-
Click + Add Question / Session / Add-on Per Ticket
-
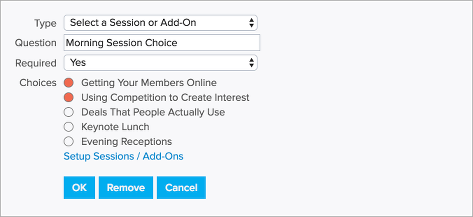
Set the Type to Select a Session / Add-On
How to Setup Your Sessions
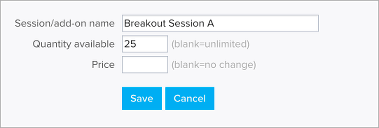
- From step 5 above, click Setup Sessions / Add-Ons
- Click + Add Session / Add-On
- Give your session a name
- Set the Quantity Available if there is a limit to the number of attendees for this session
- Set a price if there is an additional charge for attending this session
- Choose how to classify the payment (event, donation, membership, or cart)
- If
you need to override the default tax rate you can set the percentage
under Override tax rate. For example if you are charging a tax for the
tickets but the session is tax free you can set Override tax rate to
“0”.
- If you’d like to allow discount codes you can enable that
feature and then select the discount codes that you will accept for this
session. You will see that enabled discount codes will get a blue
background after you click on them.
- Click Save
- Repeat to create each session
Once sessions are created you will be able to choose which ones are available for each “Select a Session or Add-On” question. For example if you are having morning and afternoon breakout sessions you would first create all of the options for both the morning and breakout sessions. Then you would create 2 session questions, one for the morning and the other for the afternoon. You can select which options to make available for each “Select a Session or Add-On” question.
How to Create a List of Session Registrants
- Go to the Dashboard tab of the event
- Click Export CSV
- Uncheck “Primary registration information”
- Check just the session you are creating a registrant list for
- Click Export
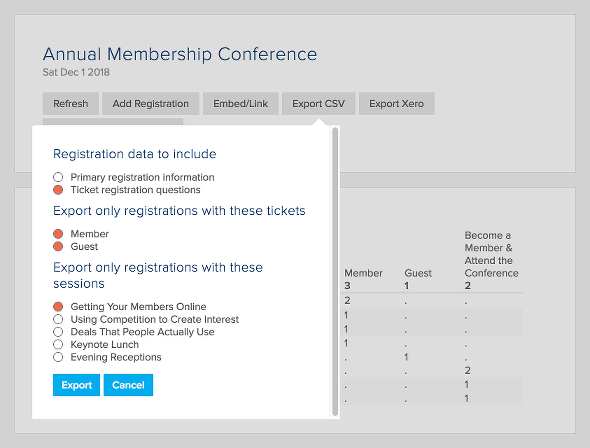
You can repeat the above directions for each session to create a registrant list for each of your breakout sessions.
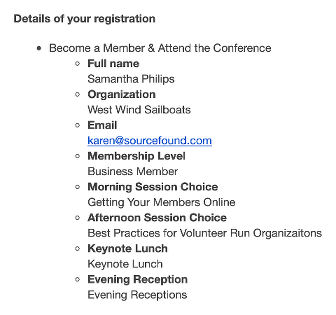
Event Confirmation Email
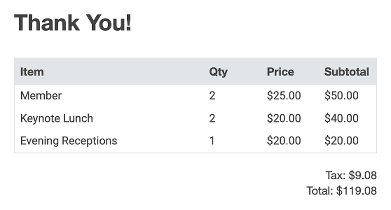
To have the email include all the information associated with each ticket, you can add the tag [tqn].
FAQs
- Sessions are set up separately on each event.
- The
discount code is applied to each session included in the registration.
For example if you set up a $10 discount code for Session A and someone
registers for 3 tickets and chooses Session A for each ticket (ie. total
of 3 Session A) the discount code will apply to all 3 Session A for a
total discount of $30.
Get Support Along the Way


